Could you imagine trying to debug an error in that Workflow?
Ha!
When something stops working, you won’t be able to fix it. Try explaining that Workflow to customer support or attempting to ask for help on the community forums 😡
…you’re on your own.
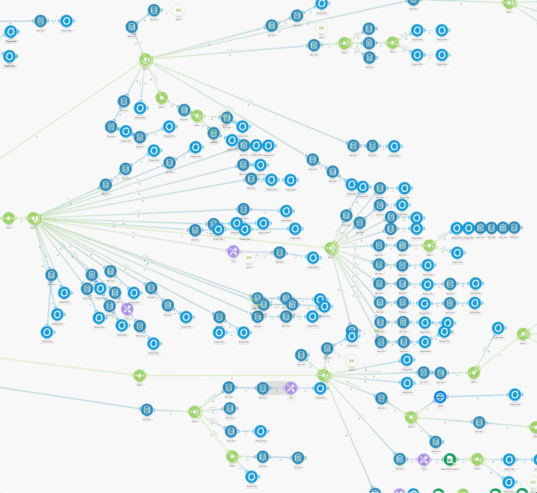
Sure, it might feel impressive that you’ve wired together this ginormous Workflow with 800 modules and complex conditional logic that routes through a labyrinth of paths.
But that impressive feeling turns to pure horror when it breaks and you can’t deliver features for your site, or your clients.
So how do you avoid this?
Workflow mistakes people make, and how you can avoid them.
Creating Workflows “in the moment”
When you need to add a new feature or some functionality, the first thing you do is open up Zapier, Make, or Integromat and start snapping together third party services.
You wire a bunch of them together into a Workflow, and then you run it, but it doesn’t work 😡
So you take a step back, rearrange a few things, run it again… and it still doesn’t work.
Now what?
You skipped the most important stage, planning.
Not planning Workflows upfront
Have a plan. Right. Sounds like fun 👍
You’d rather just crack open Zapier, Make, or Integromat and get to building, right?
😬 (grimace face)
Planning Workflows upfront avoids all the things you don’t see when you start building “in the moment” which cause you endless pain down the road.
And the truth is, it’s not a lot of effort… or work.
Though, I do admit, the first few times trying to plan things upfront can seem like more work and effort.
But remember, you’re learning something new!
Learning new things takes more work and effort upfront until you become good at it. Then, it speeds things up.
But you already know that.
So, the first step is understanding what you’re trying to accomplish. This is simple, it’s just the feature you want to build.
But instead of just “thinking” about it, you’re going to write it down.
You’re going to use an existing, proven process that has been used successfully for well over 10 years to create software features, and you’re going to use it for your no code features.
Riding on the shoulders of giants 😃
It’s called User Stories
"In software development and product management, a user story is an informal, natural language description of features of a software system. They are written from the perspective of an end user or user of a system."
Let’s look at an example…
“As a website visitor, I enter my email address into a form."
That’s it! That’s one User Story.
Let’s break that down…
“As a (role), I (take some action).”
A role can be several things:
- · Admin
- · Customer
- · Subscriber
- · Website Visitor
Remember, a role is focused on the user, and the story is focused on some action that the user must take to accomplish a goal.
Alright, that was simple.
Let try that one slightly more involved using a lead magnet Workflow:
- “As a website visitor, I enter my email address into a form."
- “As a subscriber, I receive an email with a PDF download."
- “As a admin, I can view all form submissions."
User Stories allow you to break down the nebulous feature of “lead magnet” into smaller, concrete steps that you can easily visualize.
Imagine if this were a much bigger Workflow, you’d now have a very well defined outline of what the user needs to do.
And most importantly?
You know exactly what and how to build it.
Also, notice how the story focused on 3 roles. The website visitor, a subscriber, and admin roles.
Further, notice how those roles changed as the role took an action. Or what kind of role it was based upon the action they have permission to take.
When an anonymous website visitor loads your site, they turn into a subscriber after they signup to your email list to get your lead magnet.
That’s a role that transitions from one state to another.
The last role, admin, is a totally different role and a website visitor can never transition into it. You’ll intuitively know this because an admin user, in this specific example, is a Webflow account owner who can log into the CMS.
Those 3 little sentences tell you a lot about what’s going on in this User Story.
Here’s a few sites to read through on the topic.
As you read through those sites you’ll find that they all suggest slightly different ways of creating User Stories.
Don’t look at that as confusing. Don’t get overwhelmed by it.
Instead, only understand that you are meant to use this process in a way that works best for you, your team (if you have one), and your product.
It’s okay to take the best parts of it and use in your own unique way.
-
✅ The goal is to break down nebulous statements into concrete steps that are easy to visualize.
-
✅ There’s very little effort to change your workflow at this stage if you got it wrong the first time through.
-
✅ Six months from now when you forget the details of how this feature works, you can look at your outline (User Stories).
-
✅ Ten months later when you need to extend the functionality, you can start with the User Stories and understand exactly where to hook in your new services.
Now open up Make, Integromat, or Zapier and use your User Stories as an outline to build a more simple, straightforward feature, in a quicker amount of time.
But before you do, you should…