How do you send a native Webflow form directly into the CMS? You can’t 😡 and with over 650 upvotes on the Webflow wishlist, you’re not the only one who wants to.
"Please tell me there is a way. I thought I found new gold for Web Apps but without this support it's just some kind of modern day FrontPage."
Even though you can’t do this directly through Webflow, you already know it’s possible if you use 3rd party add-ons, but…
…these services can be complicated, time consuming, and expensive 😡
But what if you could easily do this, without it taking all your valuable time, and without it breaking the bank?
I’ve come up with an easy & repeatable way to send forms into the CMS. Without huge costs, and without wasting your valuable time 🙂
I use only Webflow and the Integromat free tier, and I wanted to share how I do it.
You’ll be able to send over 300 form submissions per month on their free tier for up 2 unique forms 🤯
Perfect for getting started and running a low traffic site 👍
✅ If more is needed, you’ll pay only $9/month for over 3,000 form submissions/month, and an unlimited number of forms. Super reasonable when you need to scale up.
Let’s get started…
Part 1: Here’s what you’re building
A super quick run through of this working in action.
- ◦ Native Webflow form
- ◦ Built in the Webflow Designer
- ◦ Site visitor submits the form
- ◦ In the background…
- ◦ Integromat captures the form submission
- ◦ Integromat creates a new live CMS item in Webflow
- ◦ Integromat replies to the web browser and redirects the visitor
- ◦ The visitor is automatically redirected to their unique page (CMS Collection Page)
- ◦ The Webflow CMS Collection has a new live Item with the form submission info!
😎
Next, setup the CMS Collection in Webflow…
Part 2: Setup the CMS Collection
Setup a simple CMS Collection in Webflow to store the info that the site visitor submitted from the form.
Now, setup the home page…
Part 3: Create the home page
- Setup the Webflow home page
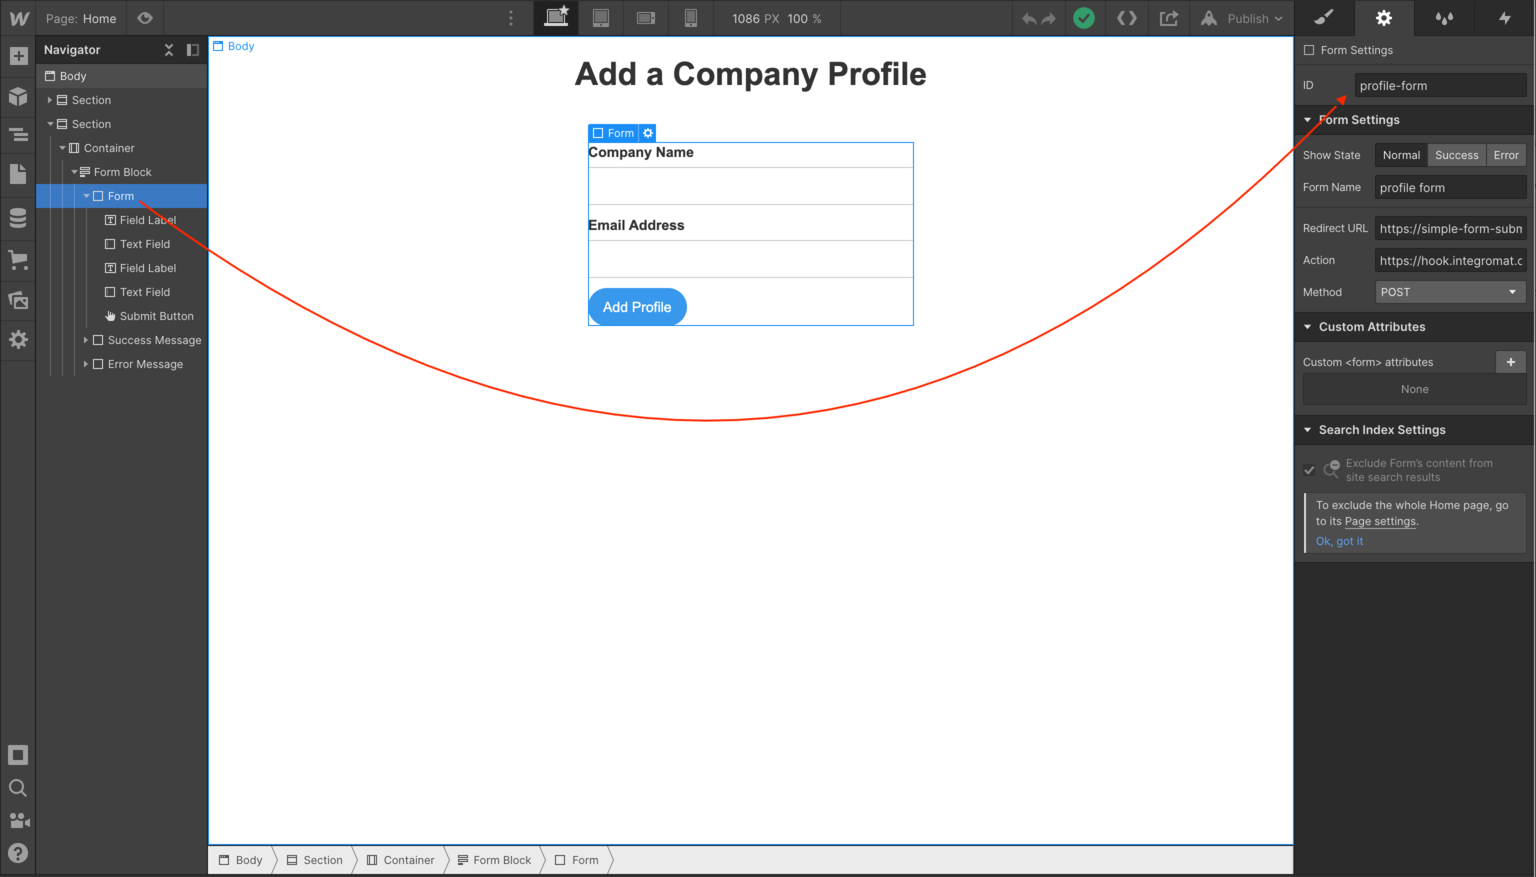
- Add a native Webflow form to the page
- Update success/fail messages on the form
- Add some very specific id’s to select elements
Make sure the element id’s are added exactly as shown. Theses id’s will match up with some custom Javascript code you’ll be pasting into the home page (in the next few steps).
Onto the backend!
Integromat will be our server-less backend to our Webflow site. Here’s how you set that up…
Part 4: Setup Integromat
Create a new scenario with a Webhooks module as the trigger. This will give you an url endpoint that you then add as the Webflow forms action.
This is where the visitor goes after tapping the form submit button 😎
While our background job is running (a.k.a. Integromat) the visitor will see a loading spinner with the friendly success message adjusted in the previous section.
Once Integromat receives the form submission, it passes the request to the next module. Set that up now…
Stop struggling right now 😡
- ⚙️ Integromat Scenario ready to import into your own project.
- 🔑 The password for the live Webflow site I built for this video.
- 🔗 This read-only Webflow project link, see how I set it all up.
- 🧩 The step-by-step guide to recreate what's in this video.
Part 5: Setup the Integromat Webflow Module
Add another module off of the first Webhooks module that you just created. This will be a Webflow module and you’ll use it to create a live item in your Webflow CMS Collection 😅
Once that’s setup, you’ll go back to your live site and submit the form with some test info.
- Confirm that Integromat captured the form submission
- Integromat created a new live item in your CMS Collection
- View your CMS Collection within Webflow
- Find your form info just submitted
💥bam!
Alright, this is getting exciting now!
Part 6: Collection Template & Custom Code
Let’s create the Collection Template Page that displays your forms info, make sure we are redirecting to it after our background job (a.k.a. Integromat) is done, and sprinkle on a little custom Javascript code 😱
Never fear! You’ll simply copy & paste it, no coding skills required 😅
Here is the Custom Code shown in the video ⚙️
// replace with your form ID
const form = document.getElementById('profile-form');

// set the Webflow Error Message Div Block ID to 'error-message'
let failureMessage = document.getElementById('error-message');

// set the Webflow Success Message Div Block ID to 'success-message'
let successMessage = document.getElementById('success-message');
Bind your Webflow Designer Element ID’s to the three ID’s listed above.
Great! Now you’ll add the last Integromat module that tells your web browser what to do.
Part 7: Setup last Integromat Module
Add another module off of the Webflow module you created in the last step. Select the Webhooks response module.
You’re going to send a reply back to the web browser telling it to redirect to the newly created CMS record 👍
Part 8: Turn on Integromat and launch the live site
Done! Just turn on Integromat and you’ve now launched the live site.
Stop struggling right now 😡
- ⚙️ Integromat Scenario ready to import into your own project.
- 🔑 The password for the live Webflow site I built for this video.
- 🔗 This read-only Webflow project link, see how I set it all up.
- 🧩 The step-by-step guide to recreate what's in this video.