"Doing stuff with Webhooks is beyond me..."
It looks like a complex feature, and Webflow doesn’t walk through it with one of their quick, catchy videos 😑
So today I’m going to walk through a simple example using Webflow Webhooks.
When anyone creates, updates, or deletes a CMS item you’ll have a Webhook automatically keep an Airtable base in sync 😀
Once you understand the power of this, and how simple it really is, you’ll want to use them all the time 😎 and have no excuses for not being able to do it with ease.
Let’s get started…
What is a Webhook?

A Webhook is an automated message sent from one platform to another.
Webhooks are automatically triggered by some “event” and not something you need to manually do yourself.
You setup a Webhook telling it where to send the message after it’s triggered by an event. In your case, you’ll send the message to Airtable.
The event that triggers your Webhook can be anything…
For example, whenever the CMS is updated (this is the “event”) a Webhook is triggered for you automatically. You don’t need to do anything. Webflow does this for you in real time. That Webhook then sends the CMS item from Webflow into Airtable.
The only action you took was to update the CMS. Triggering the Webhook, sending the data into Airtable, that is all automated for you.
That’s what a Webhook does. It’s automation that sends messages from one platform to another.
So awesome 😎
How is this different from an API?
Great question!
With an API you can add content into and get content out of a platform. The draw back is that you have to manually trigger an API, it’s not automated for you.

With a Webhook, you can only get content out of it, but…it’s automated for you based on an event getting triggered.

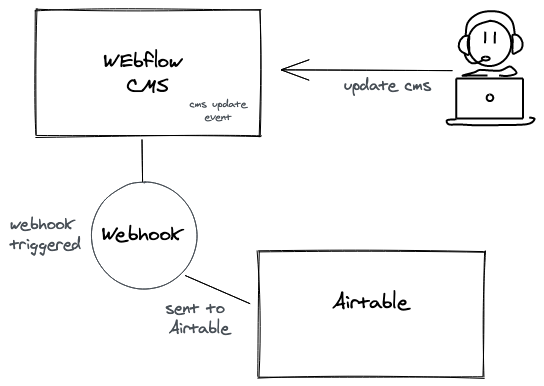
A typical pattern is to use API’s and Webhooks together. Here’s what that looks like…

In the drawing above, someone manually submits info via the API into the Webflow CMS.
When a new CMS item is created Webflow automatically triggers a Webhook for you. The Webhook sends a copy of the item out of the Webflow CMS, and into Airtable.
All triggered in real time, right when the event happens.
Let’s get this set up 😎
Setup a blank Webflow project
✅done
Setup a CMS in your new Webflow project
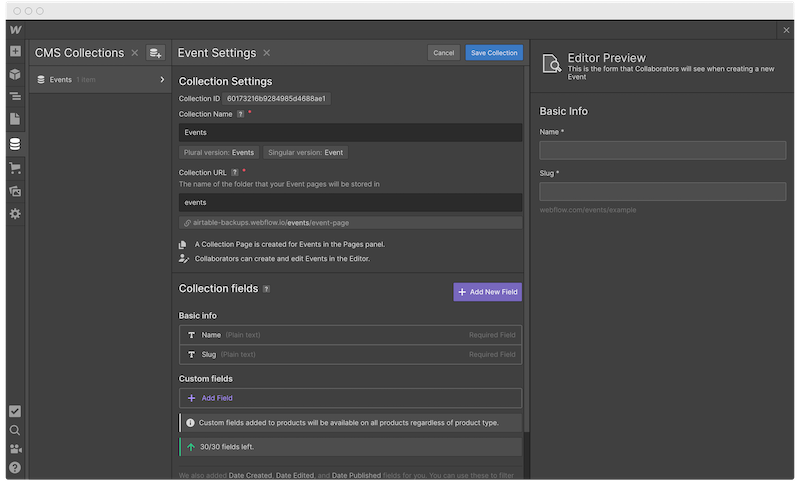
Create a Collection and any fields you like. It doesn’t matter, this is just a quick test.
✅done
Create a Make.com (formerly Integromat) Webhook
Okay, so it’s confession time 😱
I over simplified how Webhooks work so that I could more easily describe them to you.
That’s 👆 not totally correct. There is a missing step.
When Webflow automatically triggers your Webhook, it doesn’t send the CMS item directly into Airtable.
Nope, instead you need something in-between Webflow and Airtable to make it all work.
And that missing piece is Make (formerly Integromat).
Why?
The Webflow Webhook just sends a blob of raw content. Nothing more. It’s not structured or formatted.
But in order for Airtable to receive data into it’s API and update a record, you need to:
-
- Authenticate with the Airtable API, verifying you have access to the Airtable base you’d like to update.
-
- You need to store your Airtable auth credentials somewhere. Webflow Webhooks only accept a simple url and nothing more.
-
- You need to convert the raw content that the Webhook sends…into a format that the Airtable API can consume. The raw blob of content won’t work.
So it really looks like this…

But, do I have to use Make (Integromat)? Nope. You can use Zapier. But Make (Integromat) is by far the best, easiest, cheapest, and most awesomely flexible to use 🙂
Now that you understand this, create an Make (Integromat) (or if you must, Zapier) Webhook.
- ◦ Create a new Make (Integromat) scenario
- ◦ Search for and select “Webhooks”
Why are you creating a Webhook within Make (Integromat)?
You want to automatically run this Make (Integromat) scenario, whenever the Webflow CMS updates, so that you can format the content, authenticate, and pass it along to Airtable via their API.
You’re basically creating your own Webhook, without code. Pretty fancy 🙂
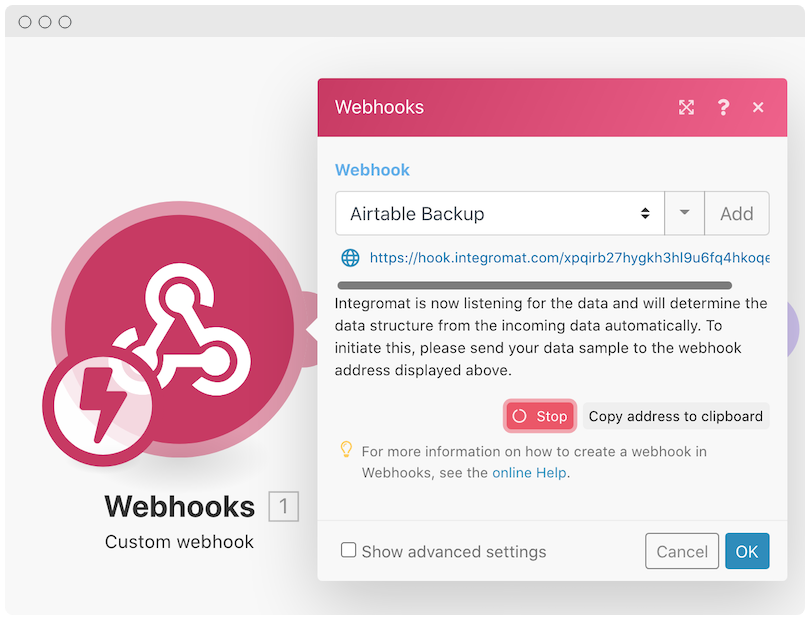
Notice the url listed in the screenshot above:
https://hook.integromat.com/xpqirb27hygkh3hl9u6fq4hkoqe1vvut
You are going to add this url into your Webflow Webhook so that whenever a CMS item is updated, it will send that item to this url.
This url triggers your Make (Integromat) scenario (a.k.a. your fancy, custom, Webhook), formats the raw content sent to it, authenticates with Airtable, and updates your Airtable base.
🤯
We’ll format and authenticate soon, but first let’s…
Create the Webflow Webhook
Now you’ll setup the Webflow Webhook that will be triggered when a CMS item is updated.
If you go to your Webflow project settings, select the integrations tab, and scroll down to the bottom…you’ll find the Webhooks section where you can add a Webhook:
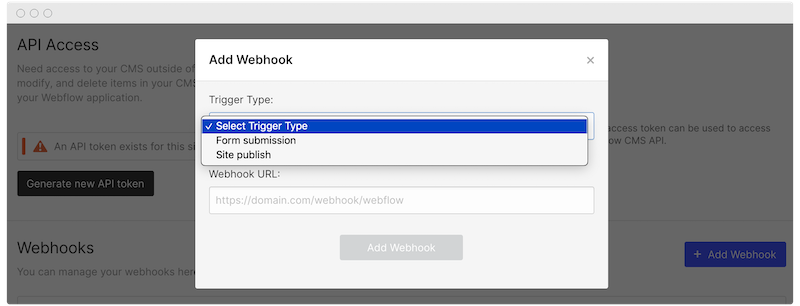
I have a love / hate relationship with Webflow 🤣 You only have 2 options through this UI and neither are the ones we need 😡
If you look at their api documentation:
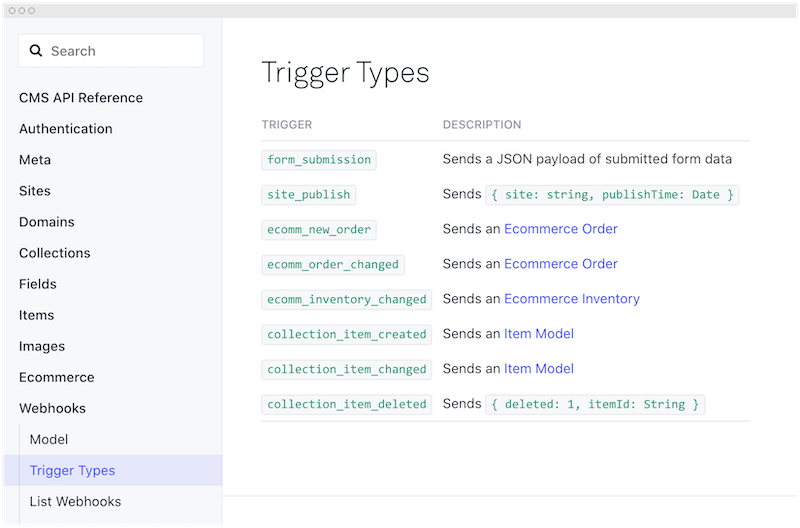
You’ll see a lot more options, specifically…
-
- collection_item_created
-
- collection_item_changed
-
- collection_item_deleted
Number 1 is the event trigger we are after. This one says, when a CMS Collection item is “created”, trigger the Webhook.
So you’ll have to set this up manually through their api using a tool called cURL. If you have a Mac chances are it’s already installed. If you have Windows 10 or later, it’s most likely installed too.
If you don’t have it installed, or if you don’t know if you have it installed, or if you don’t know how to use it, here is a fairly good resource that goes over how to install it and use it.
Unfortunately, there’s no quick & easy way around using cURL for this. But once it’s installed, you can quickly setup a Webflow Webhook!
Beyond the explanation of what a Webhook is, setting up and using cURL is the most difficult, and most technical, piece of the entire walk through. My email inbox is always open if you'd like to tell me I should work harder at simplifying this step for you.
On the same screen as the Webhooks (Project Settings –> Integrations) is the API Access section. Tap on the “Generate new API token” and copy/paste that somewhere.
Now, let’s make some API calls!
First, let’s get your Webflow site id using this cURL command:
curl https://api.webflow.com/info \
  -H "Authorization: Bearer <your webflow api token>" \
  -H 'accept-version: 1.0.0'
Replace
{"_id":"601780ca710fdf13ea6e0a93","createdOn":"2021-02-01T04:17:14.378Z","grantType":"client_credentials","lastUsed":"2021-02-02T06:37:09.577Z","sites":["601931ff59c4756b205a6b61"],"orgs":[],"users":[],"rateLimit":60,"status":"confirmed"}
The id 601931ff59c4756b205a6b61 is your site id. Copy / paste that somewhere.
Now let’s create a new Webhook for this site. Go back to Make (Integromat) and grab the URL found on the Webhook:
Mine is…
https://hook.integromat.com/xpqirb27hygkh3hl9u6fq4hkoqe1vvut
…but yours will of course be different.
Now run this cURL command:
curl 'https://api.webflow.com/sites/<your webflow site id>/webhooks' \
  -H "Authorization: Bearer <your webflow api token>" \
  -H 'accept-version: 1.0.0' \
  -H "Content-Type: application/json" \
  --data-binary $'{"triggerType":"collection_item_created", "url":"<integromat webhook url>"}'
- ◦ Replace
<your webflow site id>with the site id returned from the first cURL command. - ◦ Replace
<your webflow api token>with the API token generated earlier. - ◦ Replace
<make or integromat webhook url>with your Make (Integromat) Webhook url.
Notice we’ve added collection_item_created which means anytime a CMS item is created, Webflow will trigger this Webhook, which sends a copy of the item to the Make (Integromat) Webhook url 🤯
It’s all starting to come together 😎
If you refresh your Webflow integrations page you should see something similar too:
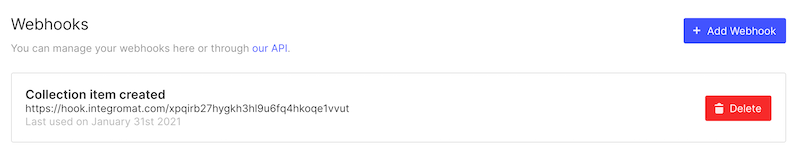
Done! Anytime we add a new CMS item, we send it to our Make (Integromat) Webhook.
Let’s give it a try…
Test it!
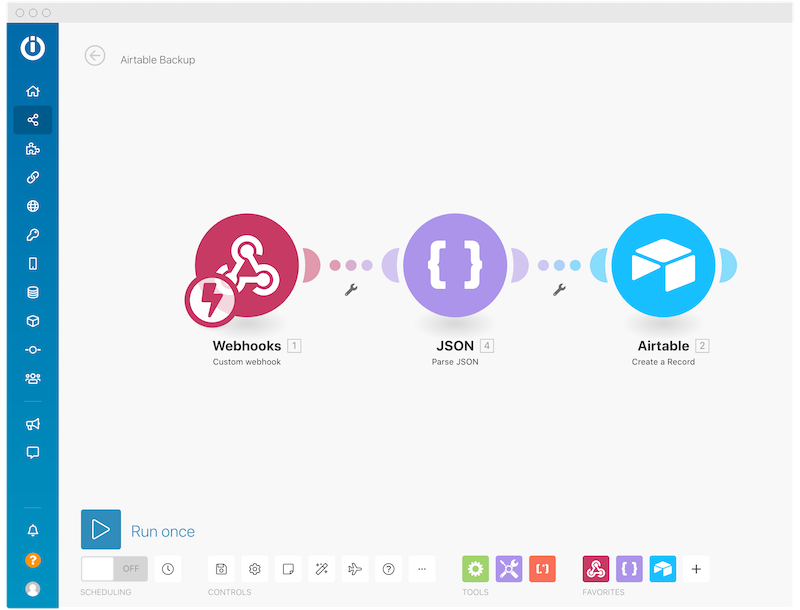
Going back to Make (Integromat) your module should looks like this:
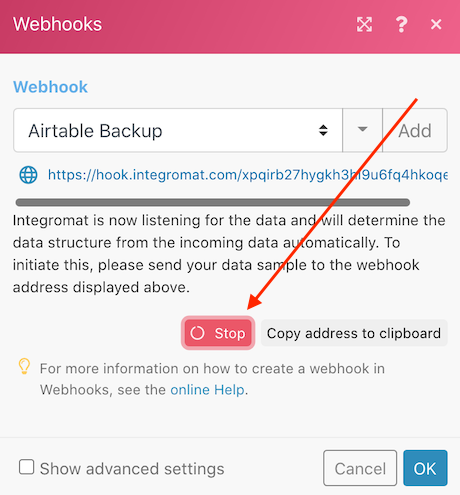
Notice the loading spinner next to the “stop” button. Make (Integromat) is waiting for us to send it some data to test the connection.
Let’s do that.
-
- Open up the Webflow CMS editor.
-
- Add a new item to your collection.
-
- Create the new item.
-
- Flip back to Integromat and find it working.
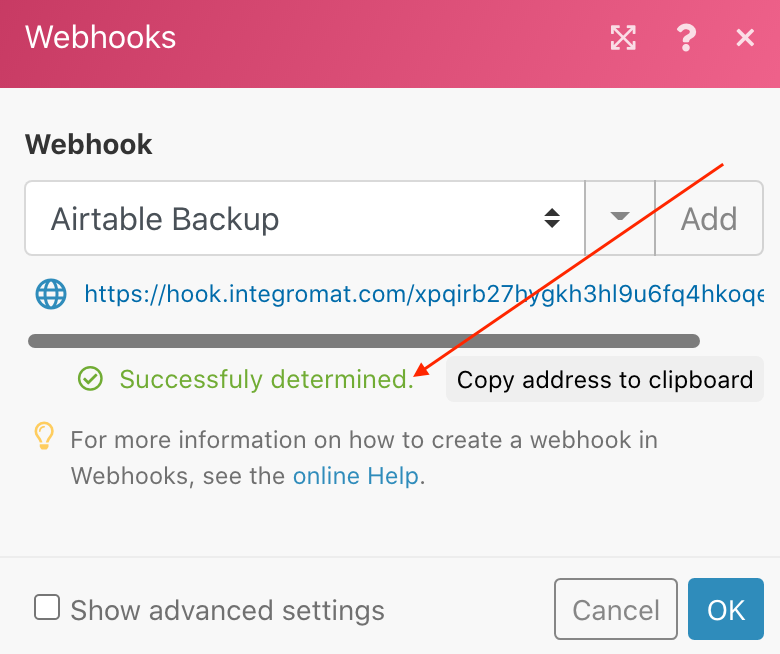
Notice it now says “successfully determined” 🙂
That means your Webflow Webhook was triggered and Make (Integromat) successfully received it 😎
Your master plan is coming together, let’s keep going…
Create an Airtable base
Not much to it, here’s mine, notice I mirror the Webflow CMS fields with this Airtable base and added a “Created time” field…

✅ done
Finish the Make (Integromat) scenario
The content sent from Webflow is a raw blob of text. Let’s format it into something that the Airtable API understands.
That something is JSON. Don’t worry, it’s easy. JSON is just a format that most platforms know how to read, including Airtable. It’s easy to setup…
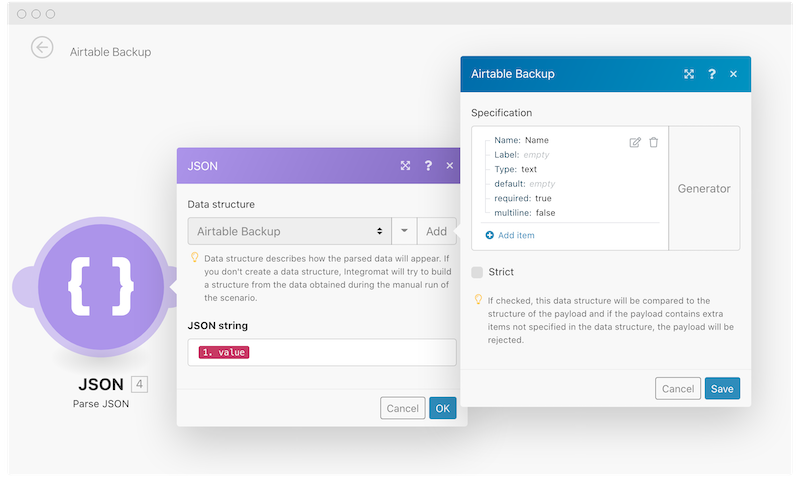
Add another module off of the Webhooks module. Set it up like I’ve shown 👆 and done.
This converts the raw content sent to us into a JSON structure that Airtable can now understand.
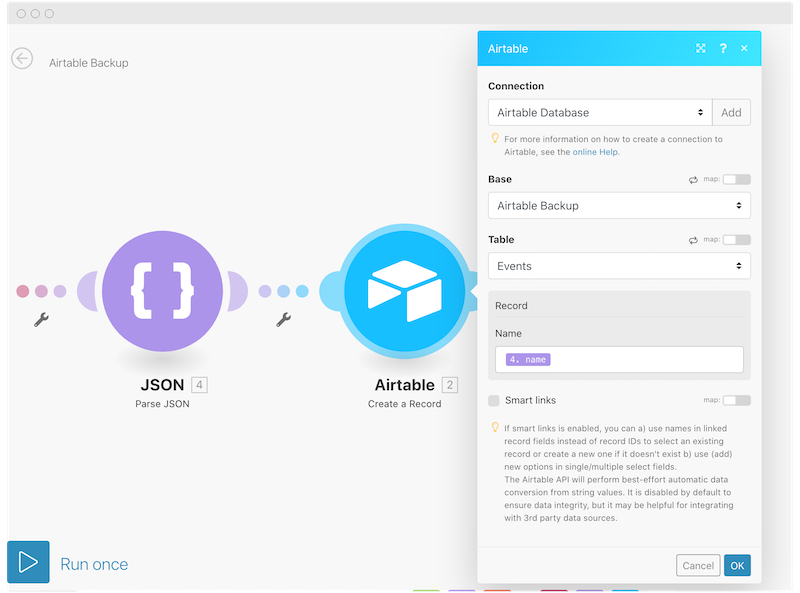
Add another module off of the JSON module. Set it up like I’ve shown 👆 and done.
This takes the JSON and creates a new record in Airtable.
You should end up with this 👆
Test it!
- ◦ Tap the “Run Once” button on your new Make (Integromat) scenario.
- ◦ Add a new CMS item, and save it.
- ◦ See that the Make (Integromat) scenario successfully ran.
- ◦ Check your Airtable for the new record.
So. Powerful 🤯
The possibilities of this are endless and incredibly simple once you get comfortable setting it up.
Cheers 🍻
🤩 Quickly learn even more with my simple, straightforward lessons
- ✅ Always be successful when using my simple approach to Webhooks.
- ✅ Discover "hidden" Webflow Webhooks - and use them as your secret advantage.
- ✅ Setup Webflow Webhooks ( the easy way ), and save your expensive Make (Integromat) and Zapier tasks.
- ✅ Save time, and pain, by learning these concepts only once - but reuse what you've learned forever.
- ✅ Step-by-step walk through using Webhooks to "Gate Access to Webflow with Stripe Payments" 🤯